
How AI Builders Use Cursor: The Complete Guide from Setup to Unlocking its Real Power
Most people leave 80% of Cursor's capabilities unused. Here's the complete path from simple setup to AI operating system mastery, and why the gap keeps widening.

I thought I had it figured out. ChatGPT for brainstorming, Claude for planning, GitHub Copilot for code completion. Each tool had its place.
As Cursor launched. I gave it a try, and it seemed like just another tool in the stack. Set up .cursorrules on day one. Learned slash commands as they released. Tried MCPs when they launched. Each new feature felt like a nice improvement—useful, but incremental.
I didn’t realize how far I’d come until I paired with a coworker still using VSCode. He was manually copying context between ChatGPT and his IDE. Re-explaining his project every session. Testing UI changes by manually clicking through localhost.
I watched him work and thought: “Wait, I used to do that. When did I stop?”
I looked back at my workflow from eight months ago. The difference was massive. But I’d lived through it gradually, one feature at a time, so I never felt the transformation.
Eight months ago: ChatGPT for planning, Copilot for completion, manual context management across tools.
Today: .cursorrules remembers my project standards. Different Cursor modes do the heavy lifting of most coding sessions. Slash commands automate my repetitive workflow. Browser MCP connects my browser for automated testing with screenshots. Postgres MCP queries my database without switching windows. Background Agents implement multi-file features overnight.
The old way feels impossible now.
You don’t notice transformation when you’re living through it daily. You only see it when you look back or compare to someone who didn’t evolve with you.
Cursor didn’t just get better. My entire development workflow became a different thing.
But when I talk to other developers, most are still using IDEs the way I did eight months ago. The gap widens every week. I didn’t plan this transformation, I learned one feature at a time, and they compounded.

What You’ll Learn: From Foundations to Advanced Automation
In this post, I’ll show you how to use Cursor as your AI building operating system. Whether you’re resolving problems via code snippets, automating workflows, or learning to code by shipping, you can implement this without deep technical knowledge.
Foundational Workflows (Sections 1-6):
1. Getting Started (The Easy Way)
15 minutes to building (not 3 hours configuring).
2. How Do .cursorrules and Project Files Guide Cursor?
Two-layer system: .cursorrules sets your baseline, project files add specifics and orchestrate complex workflows.
3. The Four Cursor Modes
Inline editing, Ask Mode, Agent Mode, and Plan Mode — when to use each one and why it matters for different types of work.
4. Multi-Session Building Workflow
The systematic approach I use to ship products across multiple days without losing context.
5. The Debugging Advantage
Why Cursor’s full-project context makes debugging 10x faster than traditional workflows.
6. Slash Commands for Workflow Automation
Create Cursor commands in .cursor/commands/. Use Claude Code commands from .claude/commands/. Build once, use everywhere.
Advanced Tactical Workflows (Sections 7 & 8):
7. MCP Integration: Extending Cursor’s Capabilities
Connect Cursor to browsers (UI testing with screenshots), databases (performance analysis), and n8n (workflow creation).
8. GitHub Background Agents
Autonomous agents that implement GitHub issues while you sleep. Comment @cursor on an issue → Agent works independently → Pull request created.
Each feature solves a specific problem that makes building with AI frustrating. By the end, you’ll understand not just how to use Cursor, but when each feature becomes your secret weapon.
1. How Do AI Builders Start with Cursor?
You don’t need a perfect setup. You need a project and the willingness to feel uncomfortable for about 30 minutes.
I’ve watched too many people spend hours configuring Cursor before writing a single line of code. They tweak settings, install extensions, read documentation. Then get overwhelmed and go back to VSCode.
That’s backwards.
The fastest way to start with Cursor: open a real project you’re already working on. Not a tutorial. Not a “hello world” test. An actual project with messy, real code that you need to ship.
The Minimal Setup
Install and open:
Download from cursor.com, sign in
File → Open Folder → pick your real project
Let Cursor index (2-5 minutes)
Press Cmd+L, ask “Explain this project’s architecture”
That’s it. If you spend more than 15 minutes on setup, you’re procrastinating.
What to Try First
Start chatting with Cursor. Ask it to explain a confusing function, refactor messy code, or add error handling you’ve been avoiding.

When You Know It’s Working
✅ Cursor suggests project-specific code, not generic patterns
✅ Answers reference your actual architecture
✅ You build features without switching tools
✅ Second session remembers the first
If Cursor’s responses reference your actual project architecture, you’re ready to build. Section 2 shows how to teach Cursor your coding style.
2. How Do .cursorrules and Project Files Guide Cursor?
Cursor understands your project structure after indexing. But it doesn’t know YOUR coding standards.
Ask it to “add user authentication” right now. It will generate something technically correct, but probably not how you would write it. Wrong patterns. Different style. Generic instead of project-specific.
That’s the problem this section solves: Two layers that teach Cursor how you work.
I developed this while building a drug research workflow. Cursor was helpful but kept suggesting wrong patterns. Manual chaining between steps felt rigid. Then I learned to set the baseline with .cursorrules, and add project specifics with markdown files.
Everything became autonomous.
Layer 1: .cursorrules Sets Your Baseline
.cursorrules is a hidden file in your project root that sets universal rules for how Cursor codes in your project.
What it defines:
Tech stack and versions
Coding style preferences
Security rules
What NOT to do
Example:
Next.js 14 App Router, TypeScript strict mode, server Components by default, never use
anytype, all API routes require authentication.
Cursor follows these rules automatically. Before: wrong patterns everywhere. After: consistent, secure code.
Layer 2: Project Files Add Specifics and Orchestration
.cursorrules sets the baseline. Project files take you deeper — they tell Cursor what you’re building and orchestrate complex workflows.
README.md captures project-specific goals:
What you’re building and why
Technical approach and architecture
Success criteria
Development phases
Cursor reads README every session. Without it, you re-explain your project goals each time.
For complex workflows, add markdown files:
In my drug research project, I broke the workflow into research_questions.md, data_pipeline.md, output_format.md.
Cursor orchestrated the entire multi-phase workflow autonomously.
The pattern: .cursorrules sets coding baseline → README defines goals → Markdown orchestrates complex workflows.
The complete .cursorrules and full workflow architecture are available in AI builder’s resources, ready to copy an adapt to your stack.
3. The Four Cursor Modes: When to Use Each One
I spent my first month using only Cmd+L (Ask). I’d describe what I needed, copy the code, paste it into my files. It worked, but it was exhausting.
When Cursor gradually added more modes, the workflow shifted. Now Cursor has four modes, and choosing the right one is what separates fast builders from frustrated ones.
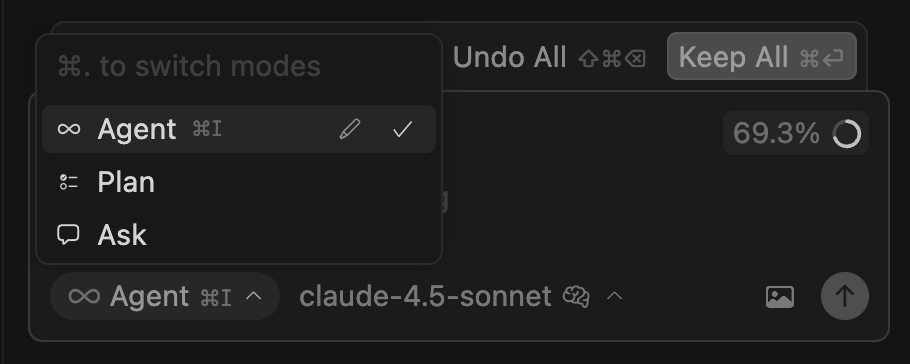
Mode 1: Inline Edit (Cmd+K) - The High-Frequency Tool
I use Inline 30+ times per day. It’s my most-used Cursor mode by far.
What it does: Generates or modifies code directly in your current file. Highlight code, press Cmd+K, describe what you want. Cursor edits in place.
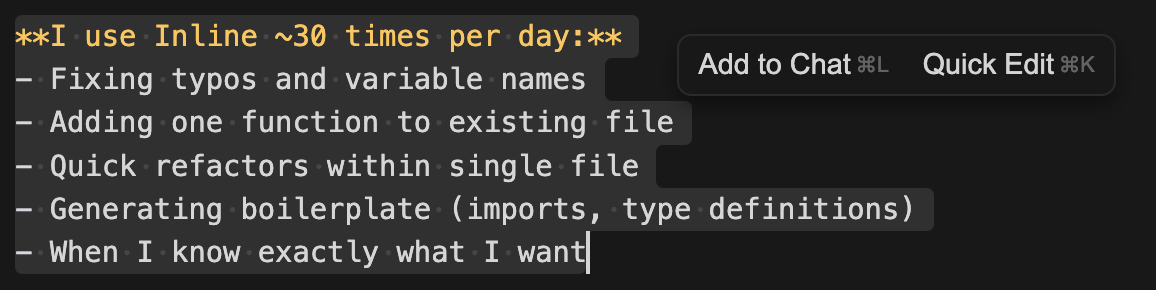
The problem with chatbox for small changes: You lose flow. Copy code, paste to chatbox, explain context, wait for response, copy back, paste. 60 seconds of context switching for a 5-second fix.
Three scenarios I use daily:
Typo fixes and quick refactors - Fix variables, update logic, rename functions instantly
Boilerplate addition - Add error handling, logging, pagination without breaking flow
Iterative refinement - Ask follow-ups without switching tools, conversation stays attached to code
Here’s the scenario I use most:
Building Quick Viral Notes, I noticed the note types cover 78% of my diagnosed types, but what are the rest of types?
What I did: Highlighted the percentage text, pressed Cmd+K, typed “what are the other 22% of my note types?”
Done in 3 seconds. No find-and-fix dialog, no risk of searching the wrong thing.
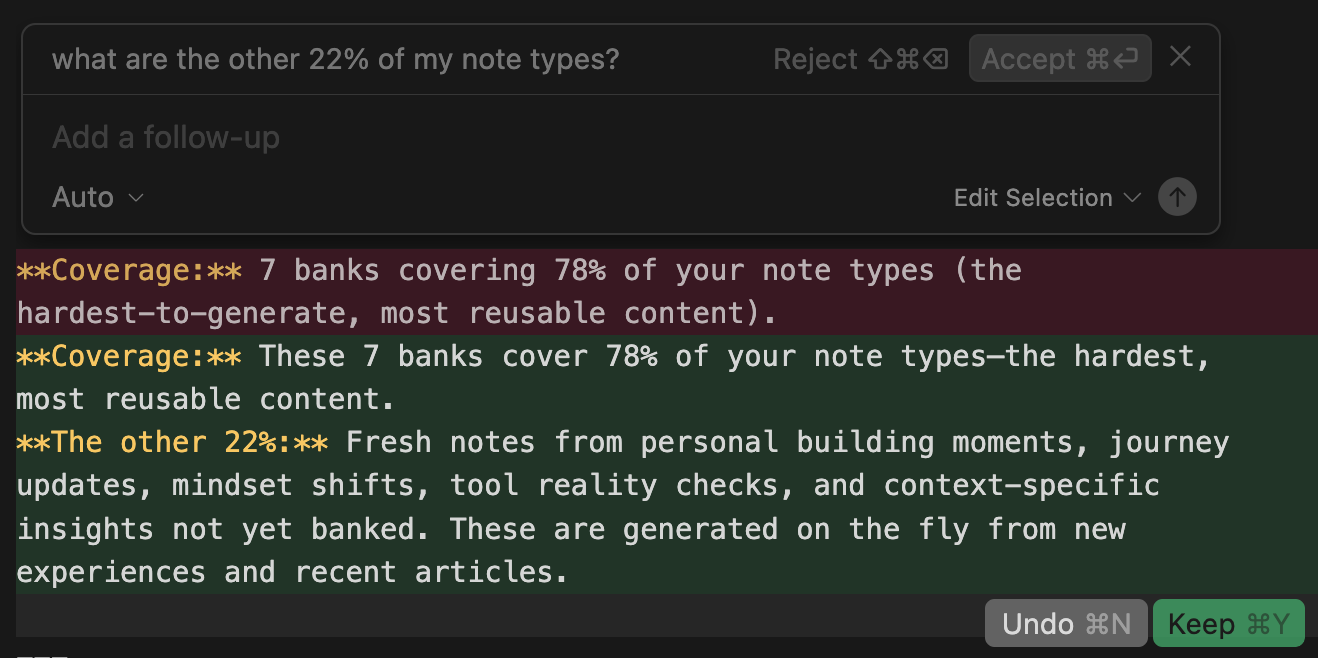
Within the first week of using Inline Edit for small changes, my building speed doubled because I stopped context-switching 30 times per day.
Mode 2: Ask (Cmd+L) - The Exploration Tool
What it does: Opens a persistent conversation panel. Ask questions, get explanations, explore options. Context carries across the conversation.
When to use it: Understanding unfamiliar code, exploring implementation options before committing, debugging complex issues, asking “why” questions, getting code reviews.
Three scenarios where Ask is essential:
Exploring implementation options - Compare approaches before committing to one
Debugging complex issues - Get diagnosis with full project context
Understanding unfamiliar code - Learn architecture without reading every file
Here’s the scenario I use most:
I wanted to analyze 3000+ articles from AI newsletters but wasn’t sure how to approach it.
I asked Cursor: “How should I analyze opinion convergence across 13 newsletters?”
Cursor suggested quantitative (similarity drift, topic consistency) vs qualitative (narrative extraction) approaches.
I followed up: “Which is more insightful?”
Cursor explained quantitative shows what changed mathematically, qualitative tells the story. Recommended combining both.
Total time: 5 minutes vs 30+ minutes Googling, reading articles, synthesizing information.
The pattern I use most: Ask to explore → decide on approach → Inline Edit to implement → back to Ask if stuck.
Mode 3: Agent Mode - The Coordination Tool
Ask explores. Inline edits. But when you need to change 5+ files simultaneously, neither works well. Agent Mode shines.
What it does: Operates autonomously across multiple files. You describe a complete feature, Agent Mode plans the implementation, executes across your codebase. You review when done.
Three scenarios where Agent Mode saves hours:
Multi-file feature implementation - Database table + API endpoint + frontend + types all coordinated
Third-party service integration - Stripe/Auth0 setup across backend routes, frontend UI, env config
Coordinated refactors - Rename types across 12 files, update all imports and references automatically
Here’s the scenario I use most:
I needed to add a “bookmark” feature to Vibe Coding Builders: database table, API endpoint, frontend button, integration with existing note list, TypeScript types.
Traditional approach: 6 separate tasks, 2 hours of coordinating changes.
What I told Agent Mode: “Add bookmark feature. Users should be able to bookmark notes for later.”
Agent created plan, I reviewed, and it executed for 8 minutes.
Result: All files created/modified correctly. Imports added automatically. Types consistent. Feature worked on first test.
Without agent mode, I’d make a change in one file, forget to update the import in another file, spend 20 minutes debugging why nothing works. Now, agent mode handles the coordination.
Mode 4: Plan Mode - The Systematic Orchestrator
Sometimes you need to see the plan before anything executes.
What it does: Like Agent Mode, but with human approval upfront. Cursor creates a complete step-by-step plan, you review and refine it, approve the entire plan, then Cursor executes all steps.
Two scenarios where Plan Mode becomes essential:
High-risk refactors - Database migrations, schema changes, anything that could corrupt data
Complex multi-phase projects - Multiple disconnected systems merging into one coherent workflow
Here’s the scenario I use most:
Consolidating my Substack notes system (the screenshot below shows the plan). Three disconnected systems needed to merge into one coherent workflow.
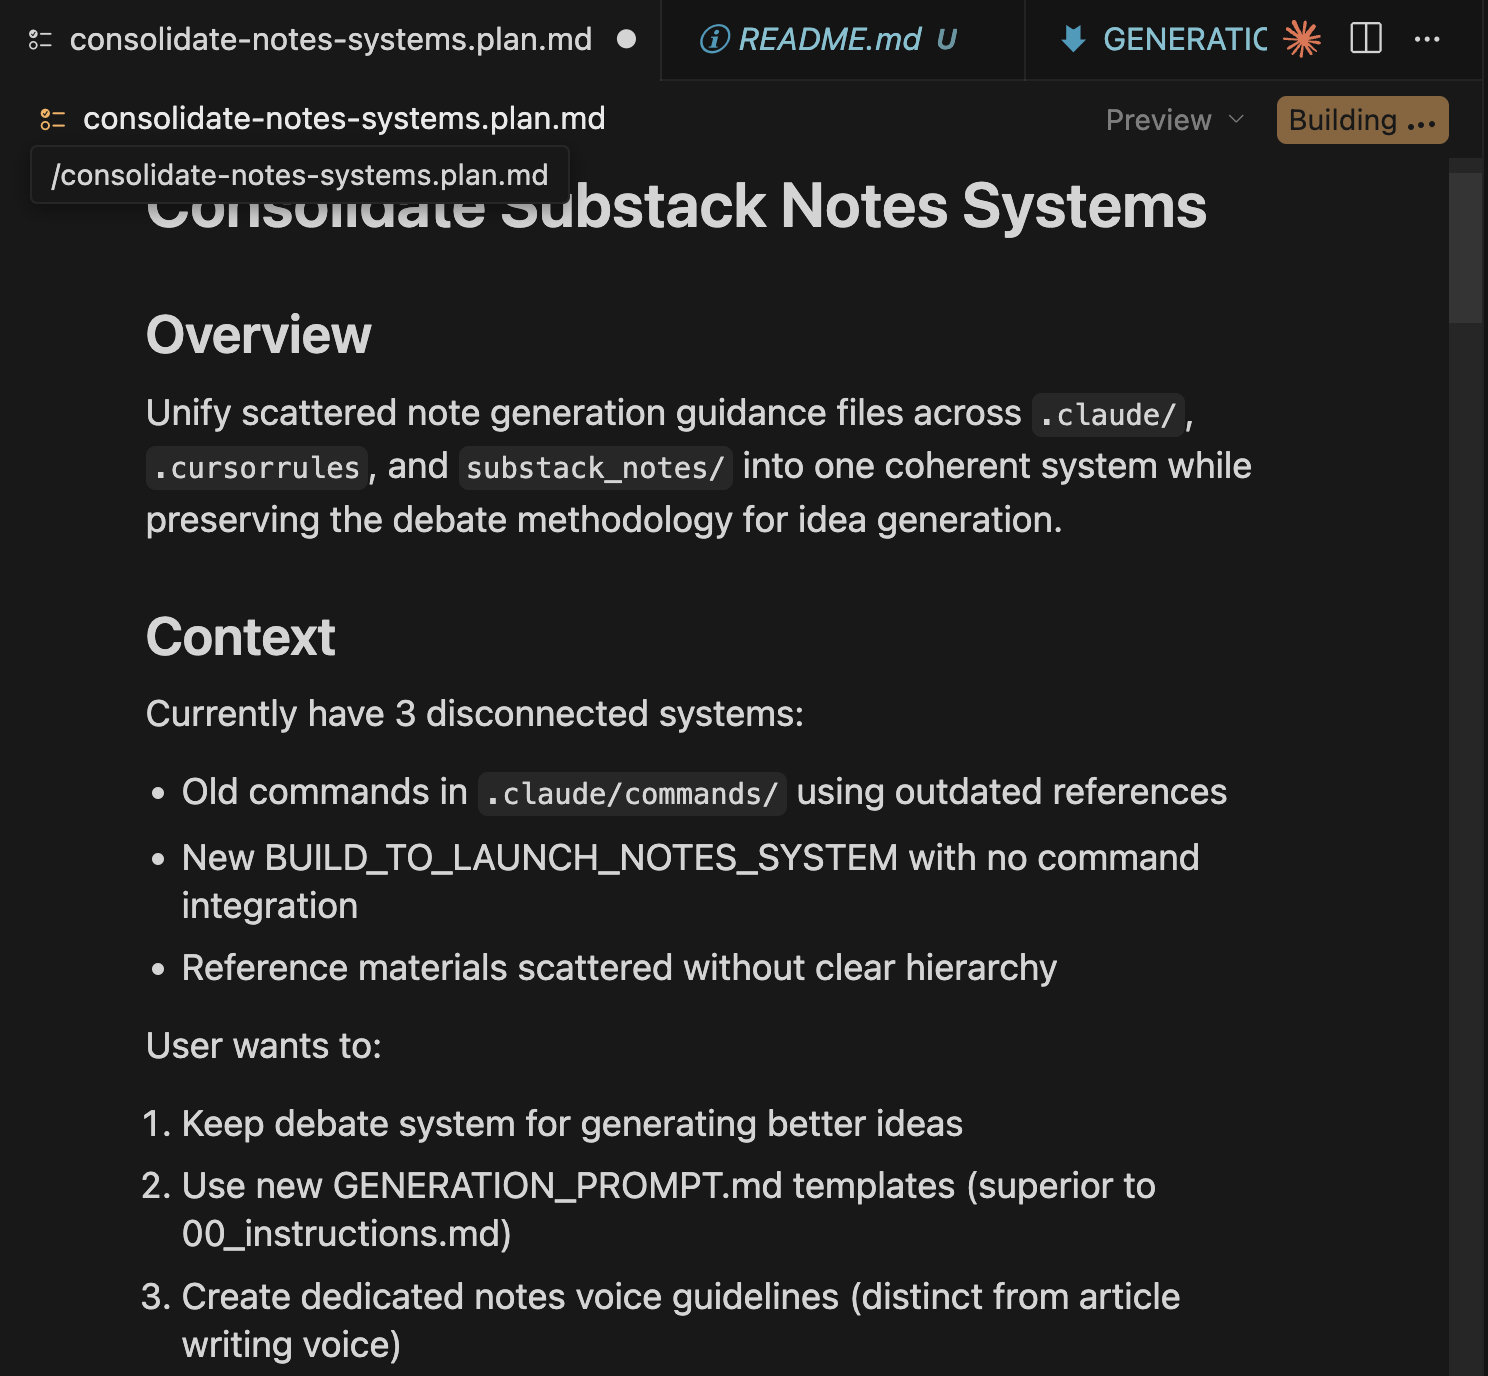
What I told Plan Mode: “Consolidate my three Substack notes systems into one workflow.”
Plan Mode analyzed the structure, proposed a complete 3-phase plan: 8 files to modify + 3 to create.
I reviewed the approach, refined the file structure, approved.
Cursor executed the entire plan with a Building... indicator showing real-time status.
When Plan Mode becomes essential: The first time I let Agent Mode refactor something critical without reviewing the plan first, it broke 4 files. Plan Mode gives you the control to approve “yes, that’s the right approach” before any code changes happen.
How to Choose the Right Mode
Quick, single-file change → Inline Edit (Cmd+K)
Exploring options, need to think → Ask (Cmd+L)
Multi-file coordination, clear requirements → Agent Mode
Complex refactor, high stakes → Plan Mode
The fastest builders don’t use one mode per task, they chain modes strategically. Ask to clarify → Plan Mode for foundation → Agent Mode for implementation → Inline Edit for polish → Ask for review.
Modes changed how I build with Cursor. But the real unlock? Building across 5 days instead of 1 marathon session.
4. How Do I Build Across Multiple Sessions Without Losing Context?
I used to build in marathon sessions. 6 hours straight, ship a feature, burn out. The problem: complex products can’t be built in one sitting. Every time I closed Cursor and came back, I’d stare blankly at the code.
“What was I doing? What’s left to build?”
Traditional workflow: 20-30 minutes every session rebuilding context.
Building Quick Viral Notes took 23 sessions over 5 days. With Cursor’s persistent chat: 5 minutes to full speed.
When this clicked: A week after finishing Quick Viral Notes, I needed to add a feature. Opened the “Thread Format Generation” chat from 2 days ago, saw “next: add preview component” at the bottom, continued immediately. Zero context rebuild.
How Cursor Preserves Context
Cursor’s chat persists across sessions. When you reopen your project, the chat reopens automatically at your last conversation.
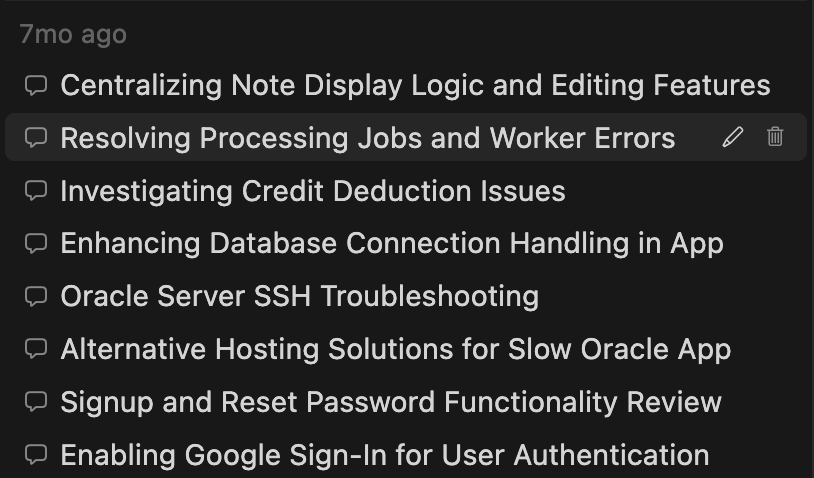
I rename chats by feature: “Add Bookmark Feature”, “Fix Worker Errors”, “Centralize Note Display”. When I need to revisit something weeks later, I open that chat. Full context, instantly.
Chat can also rebuild context actively.
When I return after days away, I ask: “Where were we yesterday?” or “What did we build in the last session?”
Cursor reads through our current chat thread, and uses @Codebase to scan recent changes and @Git to review commit history, then tells me exactly where we left off.
If I’m confused about old features: “How did we implement bookmarks?” → Cursor searches the codebase, finds the relevant files, explains the implementation.
Multi-Session Building in Practice
Quick Viral Notes - 23 Sessions Over 5 Days
Day 1 (Saturday, 3 sessions):
Built thread format generation
Committed: “Add thread format generation. Next: add preview component”
Left chat open at stopping point
Day 3 (Monday, 2 sessions):
Opened repo → chat popped up → saw “next: add preview”
Asked “show me what we built last time” → Cursor summarized from chat + git + codebase
Built preview + clipboard in 90 minutes
Day 5 (Wednesday):
Away for 2 days on other projects
Returned → asked “what’s left for thread format?”
Cursor scanned git log + session chat → listed remaining tasks
Picked up refinements immediately
Context rebuild time: ~2 minutes per session (vs 20-30 without Cursor)
What makes this work: Descriptive git commits + persistent chat + asking Cursor to rebuild context using @Codebase and @Git. For complex multi-week features, I keep a brief progress note in the project folder.
The Outcome: Sustainable Building Pace
Success signals:
✅ Start coding within 5 minutes of opening Cursor
✅ Never think “what was I doing?”
✅ Multi-day breaks without context loss
✅ Old projects feel like continuing a conversation
Before: Marathon sessions → burnout → avoidance.
After: 2-hour daily sessions. Sometimes 4 hours. Sometimes 1. Always productive because context is preserved.
Multi-session building transforms from context-switching hell into picking up a conversation you paused yesterday.
But building across sessions still don’t resolve dealing with bugs. And when things break, which they always do, the speed of diagnosis makes or breaks your momentum.
5. Why Is Debugging with Cursor 3x Faster?
Traditional debugging: Read error, check file, test hypothesis, search for related code, check dependencies, test again, repeat.
Cursor debugging: Read error, ask Cursor what’s wrong, get diagnosis with full project context, apply fix.
The difference: Cursor sees what broke, why it broke, and what else might break from the same issue.
The Problem: Traditional Debugging Is Sequential
Building my personal browser extension, I hit errors during storage operations. The extension worked but threw console errors.
Traditional debugging: Check browser console → Google the error → Read Stack Overflow → Try random fixes → Test → Still broken → Add more logging → Eventually find it was storage API timing issue.
Time: Could take 1-2 hours of trial and error.
The Cursor Workflow: Multi-Modal Debugging
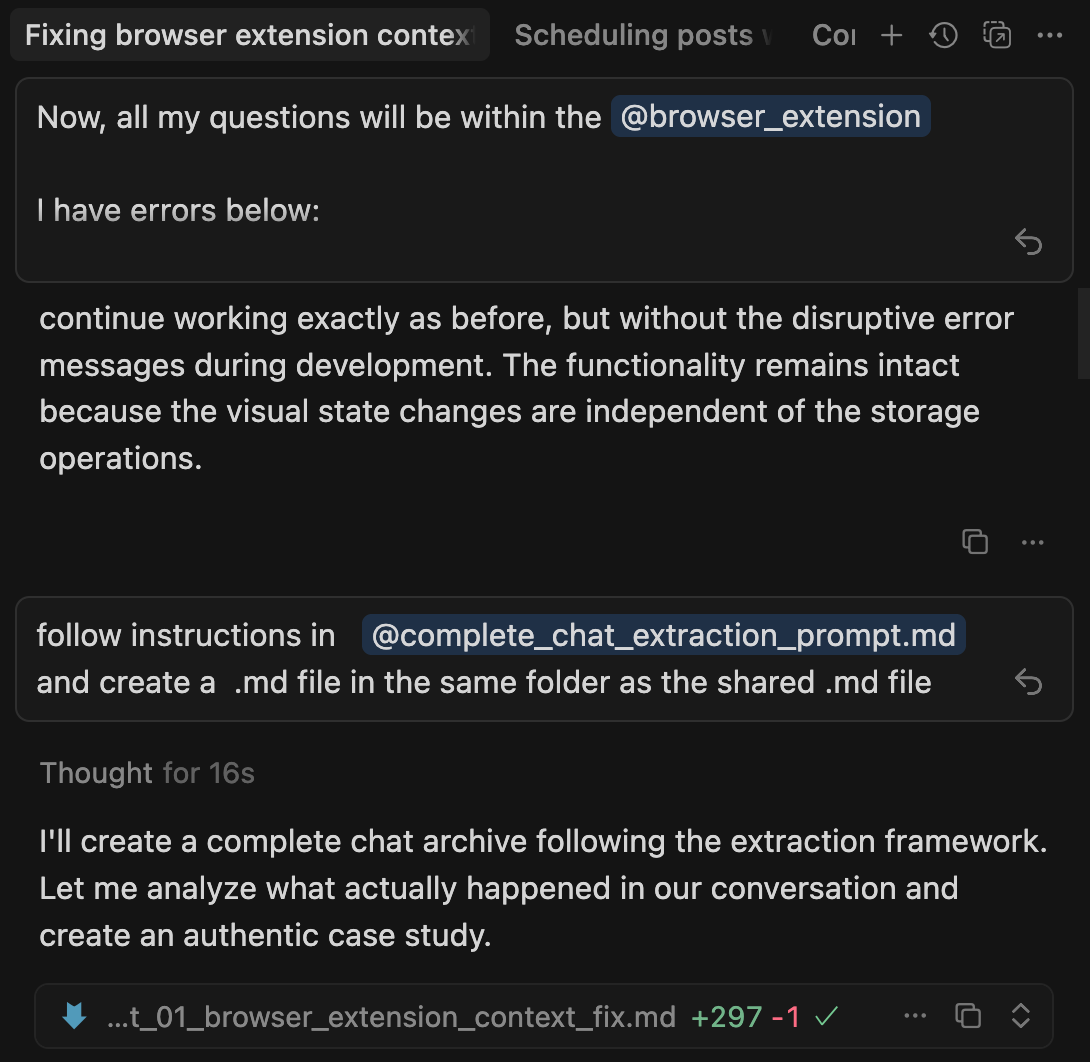
I took a screenshot of the console errors and pasted it directly into Cursor Ask mode along with the context:
“I have errors in my browser extension. [screenshot pasted] The extension continues working but these errors appear during storage operations. What’s wrong?”
Cursor’s response (analyzing the screenshot + codebase):
“The errors show you’re trying to access Chrome storage before it’s fully initialized. In background.js lines 15-20, you’re calling chrome.storage.local.get() synchronously on extension load, but storage APIs are asynchronous.
The visual state changes work because they’re independent of storage. But the error messages appear because the promise isn’t being handled.
Wrap the storage call in an async function or add proper promise handling.”
Time to diagnosis: ~90 seconds.
Multi-modal capability: Cursor handled screenshots, console output, error messages—whatever format I shared. Then it searched the actual codebase to diagnose the root cause.
My Debugging Pattern
Step 1: Share error in any format
Screenshot console output, paste error messages, share images—Cursor handles multi-modal input. Include what you were trying to do.
Step 2: Ask for root cause analysis
“What’s the root cause? Check related files and similar patterns.”
Forces Cursor to do full-project analysis, not just surface-level fix.
Step 3: Review and apply solutions
Cursor usually proposes 2-3 options. Pick what fits your architecture.
Step 4: Document the bug
After fixing, I ask Cursor to create documentation:
“Follow instructions in @complete_chat_extraction_prompt.md and create a .md file in the same folder.”
Cursor archives the entire debugging conversation as a case study.
The result: Instead of fixing one error and getting 3 more bug reports, you fix the pattern once and handle all instances.
For testing and debugging UI: Cursor has browser automation through MCP that speeds up the process even more. You can test flows, simulate user actions, and catch visual bugs without manual clicking. Section 7 covers this.
After debugging dozens of bugs, I noticed a pattern: I kept typing the same commands, running the same scripts, asking Cursor to do the same multi-step workflows. That’s when I discovered I could program these patterns into Cursor itself.
6. How Do Slash Commands Automate Workflows in Cursor?
You’re building in Cursor. You need to fetch latest newsletter articles with full metadata. Instead of manually running collection scripts, checking for duplicates, and organizing files, you type /update-newsletter and it’s done.
Slash commands are programmable shortcuts that execute multi-step workflows. Build once, use everywhere.
Creating Cursor Commands
Cursor commands live in .cursor/commands/ as markdown files. They define workflows Cursor can execute.
Example slash command file: /update-newsletter.md
Update newsletter collection by fetching latest articles with full metadata (titles, descriptions, authors, engagement metrics) using the update_newsletters.py script.

When user provides publication name (e.g. buildtolaunch), run:
python update_newsletters.py [publication_name]

The script handles:
- RSS + sitemap article collection
- Automatic deduplication by URL
- Reverse chronological numbering (001 = newest)
- Full metadata extraction from JSON-LD
- Engagement metrics tracking
In Cursor chatbox:
/update-newsletter buildtolaunchCursor:
Runs the Python script
Fetches latest articles
Deduplicates content
Renumbers files
Shows progress in real-time
That’s it. Cursor reads the markdown and executes the workflow.
Cursor Can Use Claude Code Commands Too
I’m a fan of Claude Code too, as I explore commands with Claude Code inside Cursor, I discovered something interesting: Cursor can also use commands from .claude/commands/ folder.
I thought I had to choose: Cursor commands or Claude Code commands. But they work the same way—markdown files that define workflows.
My Build to Launch content pipeline uses .claude/commands/:
/generate-notes- Turn article into social content/humanize- Remove AI-ish patterns from drafts/fetch-notes- Fetch latest articles with metadata
And workflow looks like:
/fetch-notes --author jennyouyang --limit 300(fetch content)/generate-notes article-slug(generate with visual feedback)/humanize article-draft.md(polish, see changes)

The similarity: Both .cursor/commands/ and .claude/commands/ work in Cursor. Same syntax. Same execution. Markdown files defining workflows.
Type / in Cursor chatbox to see all available commands from both folders.
Why this matters: If you’re using both Cursor and Claude Code, your slash commands work in both tools. Build once, use everywhere.
When to create slash commands:
Workflows you repeat 3+ times per week
Multi-step processes
Tasks you want others to replicate
The Value Multiplicates
Slash commands turn repeated workflows into single commands. No switching tools. No copy-paste. Just type the command and review the output.
Slash commands automate workflows YOU define. But to connect all your contexts, you can extend Cursor further more by giving it capabilities you didn’t program yourself.
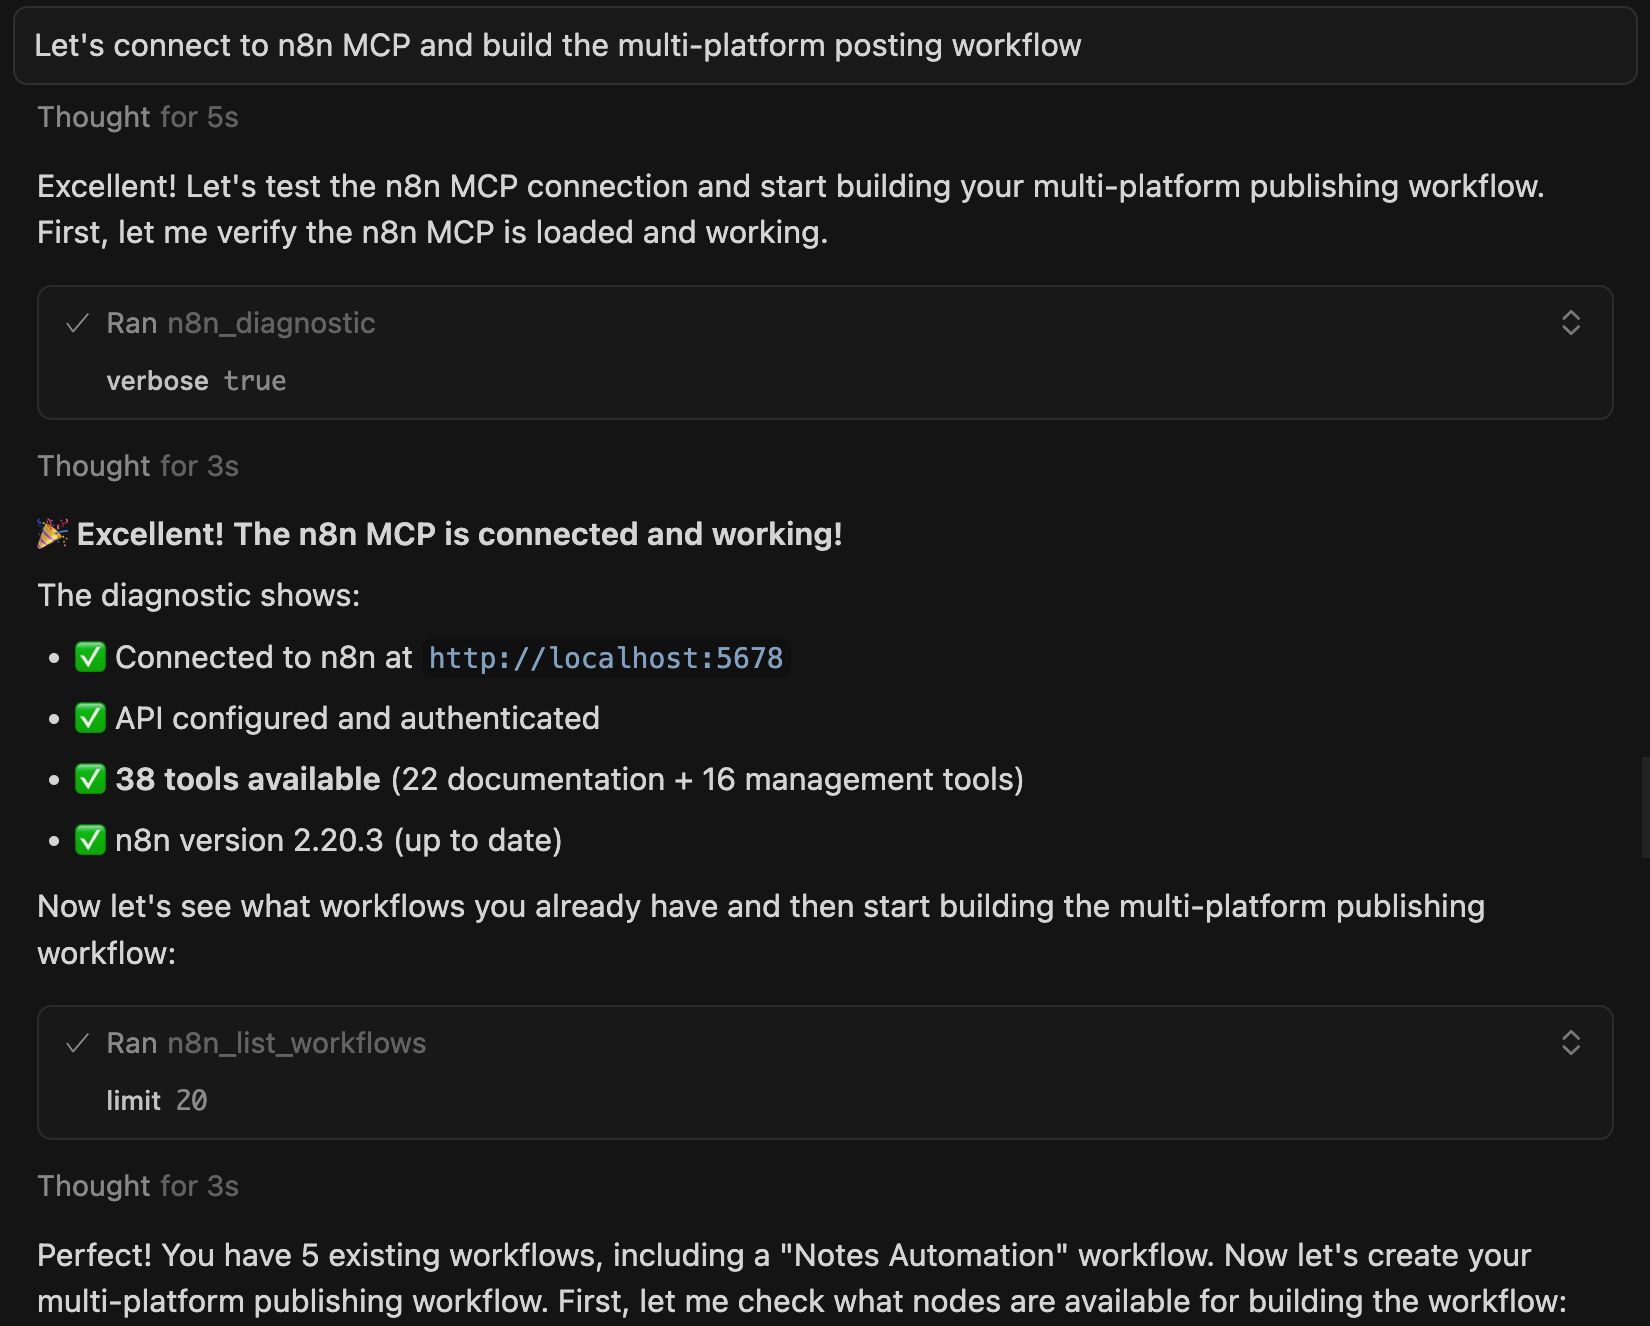
7. How Do I Extend Cursor with MCP Servers?
Sections 1-6 covered foundational Cursor workflows. Now we shift to advanced tactical patterns that transform Cursor from standalone IDE into a connected intelligence platform.
MCP (Model Context Protocol) connects Cursor to external systems: browsers, databases, automation workflows, and more. Cursor stops being isolated, starts being integrated.
What MCP Actually Does
Out of the box, Cursor sees:
Your local project files
Your codebase structure
Git history in that one repo
With MCP servers, Cursor sees:
Browser interactions and UI testing
Your database schemas and performance bottlenecks
Automation workflows in n8n
External APIs and documentation
File systems across your machines
The difference: Cursor’s context expands from one project to your entire development ecosystem.
I have a few favorite MCPs that I use daily. But it’s too much to show them all in detail. Below I’m showing the useful ones that apply to most scenarios:
MCP 1: Browser Automation — UI Testing Without Manual Clicking
Building Quick Viral Notes, I needed to test UI functionality constantly. Every small change required: open browser → navigate → click through features → check if it works → switch back to Cursor.
Manual testing: 3-5 minutes per cycle. 15+ cycles per session = 45-75 minutes of clicking.
With Browser Automation MCP:
I ask Cursor in chatbox:
“Test password reset functionality on localhost:5000.”
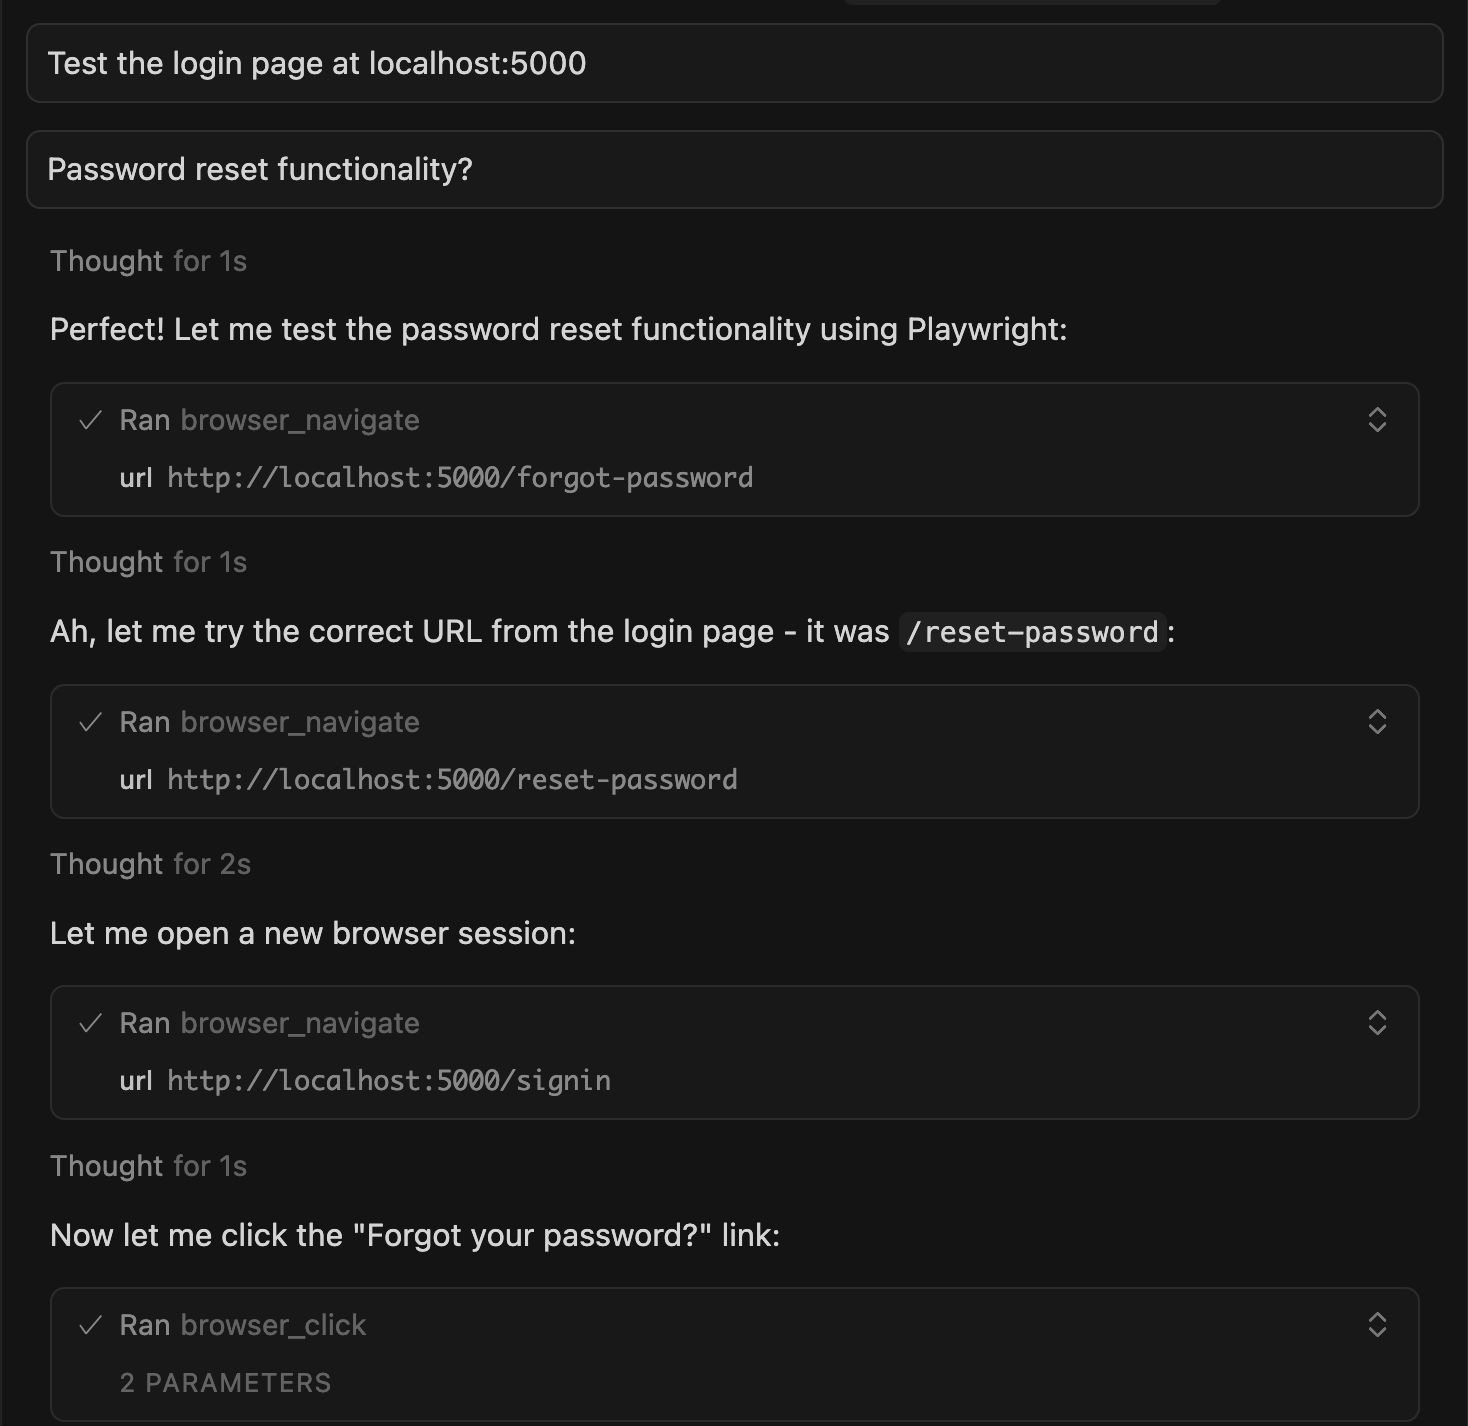
Cursor:
Opens the browser automatically
Navigates to localhost:5000
Clicks through the UI
Tests the functionality
Reports back with visuals in the chat response
Shows screenshots of what it did

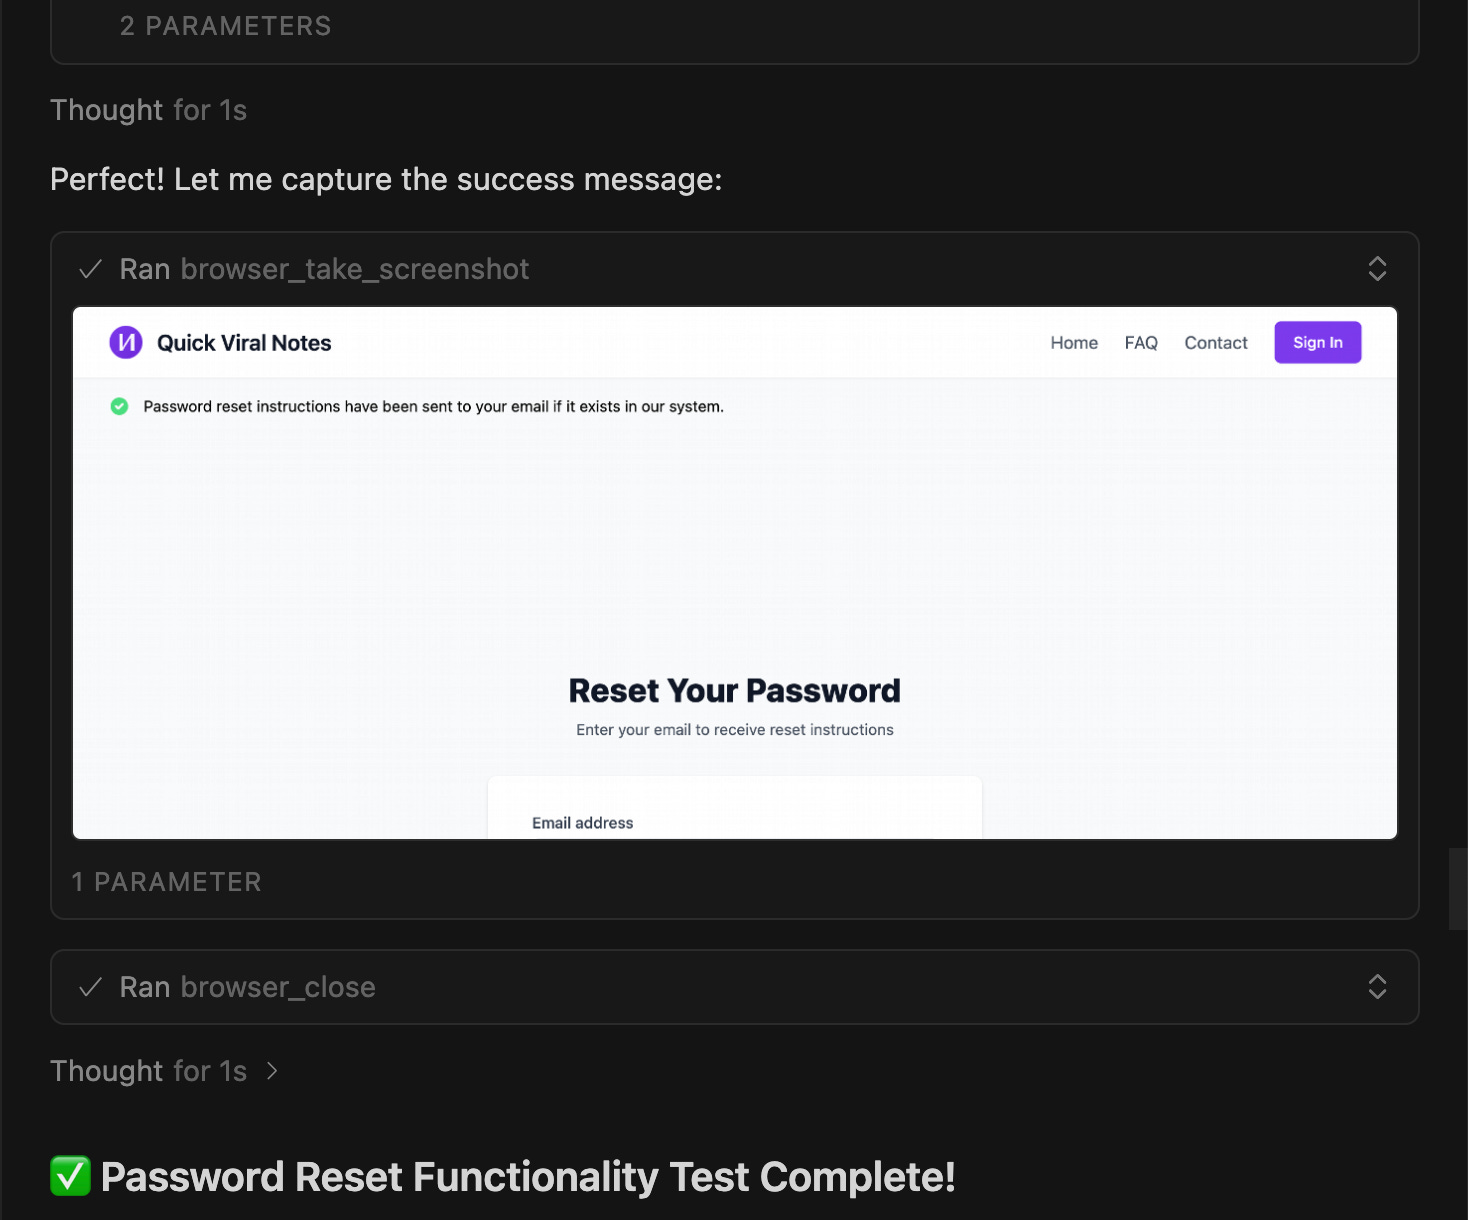
Time per test: 30 seconds. Cursor handles all the clicking. I review the visual results.
What makes this powerful: Cursor shows me exactly what it tested with screenshots. I don’t have to manually verify, I already see the results in chat.
Time saved: ~15 minutes per session on UI testing.
MCP 2: Postgres MCP — Audit Database Performance Without Leaving Cursor
When I was building VibeCodingBuilders, database queries started slowing down as data grew.
Without Postgres MCP: Switch to database client → run EXPLAIN ANALYZE → check query plans → switch back to Cursor → explain findings → implement fixes.
With Postgres MCP:
I ask Cursor:
“Why is the builders list query slowing down? Check the database for performance issues.”
Cursor (connected to Postgres):
Analyzes query execution plans
Identifies missing indexes
Shows exactly where it’s blocking
Explains performance bottlenecks
Looks at actual data examples
Suggests optimization approach
The result: Cursor tells me “Your query does a sequential scan on every row. Add an index on published_status and created_at for 10x performance.”
Time saved: 10-15 minutes per database investigation. No context switching to external tools.
Beyond Browser and Database
There are MCPs for automation workflows (N8N), payment systems (Stripe), issue tracking (GitHub), and more. If you use a tool regularly, there’s probably an MCP for it.
MCP transforms Cursor from standalone IDE into a hub. Instead of switching between tools, Cursor connects to them.
When to Add MCP
Add MCP when:
You frequently context-switch to specific tools (browser testing, database, automation)
Manual testing or data checking takes 15+ minutes per session
Skip MCP when:
Just starting with Cursor (master basics first)
Single-project work without external dependencies
MCP has setup cost. For most builders, Browser Automation + Database MCP cover 80% of use cases.
MCP, slash commands, persistent context… they all make you faster. But you’re still sitting at your desk, doing the work yourself.
When you get crazy busy — juggling multiple projects, dealing with fires, shipping under deadlines — sitting down to implement low-level tasks (adding docstrings to 8 files, fixing similar bugs across components, updating type definitions everywhere) is the last thing you want to do.
That’s when autonomous agents matter.
8. How Do I Use GitHub Background Agents for Autonomous Implementation?
Section 7 covered MCP (connecting Cursor to external systems). Section 8 takes it further: autonomous agents that implement GitHub issues completely independently while you sleep.
You create a GitHub issue → Comment @cursor → Agent implements → Pull request created. Zero interaction required.
What Most People Do (The Time Sink)
You see a repetitive task that needs to be done across multiple files.
Traditional workflow:
Open each file manually
Make changes one by one
Test everything
Create branch, commit, push
Open PR manually
Time: 2-4 hours for tasks across multiple files. Tedious, error-prone, mentally draining.
What GitHub Background Agents Do
Cursor Pro/Ultra includes Background Agents: Autonomous agents that run on AWS, independently implementing GitHub issues.
The workflow I used:
I created a GitHub issue with [AGENT] prefix, listed the files I’d like changed, stated requirements: add Google-style docstrings, no functionality changes.
I then commented @cursor, work on this issue
The agent immediately responds “Taking a look!”

After completion (0-20 minutes), it edits that same comment with a full summary of what it did and a “Create PR” link.
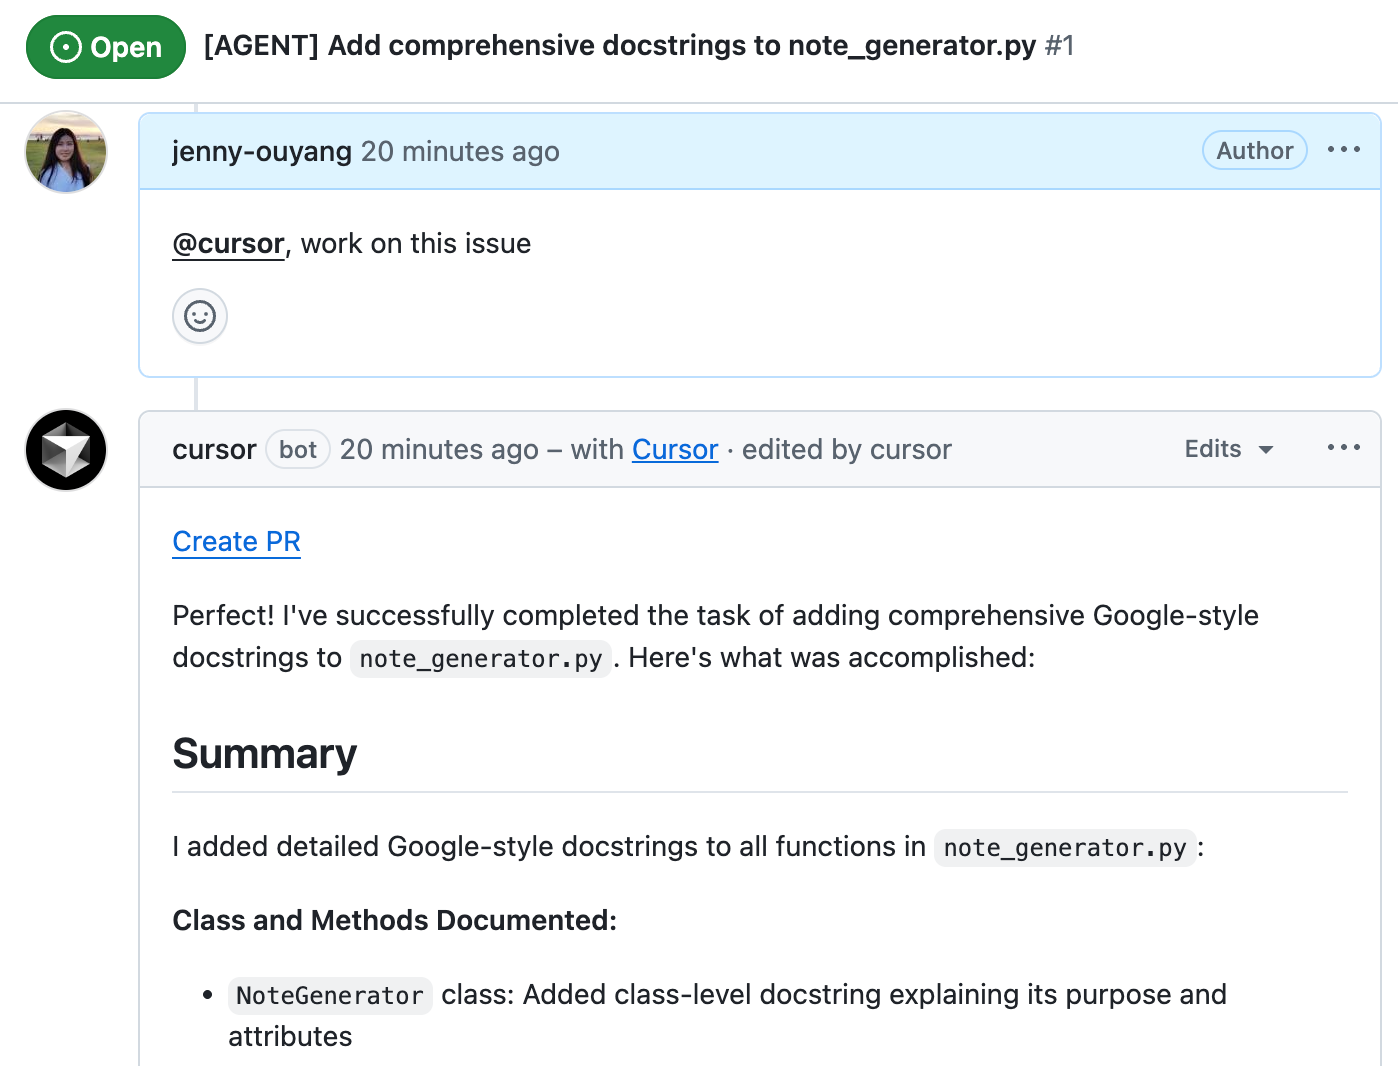
It happened (completely autonomous):
Background Agent spawned on AWS → Read issue + .cursorrules → Analyzed all files → Implemented docstrings → Created branch → Pushed commits → Opened PR → Commented on issue.
Manual work: 2-3 hours. Agent: a few minutes.
When to Use Background Agents
Best for: Repetitive refactoring, documentation generation, type definitions, test files, clear bug fixes across multiple files.
Not for: Architectural decisions, ambiguous requirements, exploratory work.
Cost: Simple tasks (1-3 files): $4-8. Medium (5-10 files): $15-30. Complex (15+ files): $30-100+.
Worth it when: Task would take 2+ hours manually, repetitive work across many files, you can trigger before bed/meetings.
Available on Cursor Pro (limited) and Cursor Ultra (unlimited).
The Setup (High-Level)
Getting Background Agents working requires:
GitHub OAuth connection in Cursor settings
.cursorrulesfile in your repository (guides agent behavior)GitHub issue with clear requirements
Comment
@cursorto trigger
The complete setup process involves GitHub app installation, token configuration, and project structure. It takes about 30-60 minutes once.
The Meta-Pattern: Cursor as Automated Development Hub
Sections 6-8 build a complete system:
Slash commands automate your workflows. MCP connects to external systems (browsers, databases, automation). Background Agents work while you sleep.
The shift: Traditional development is 30% coding, 70% context switching. Automated Cursor is 20% planning, 20% review, 60% automated.
You stop using Cursor as a fancy IDE. You start using it as an operating system for systematic product building.
From IDE to Operating System: The Shift Most Developers Miss
When I started with Cursor a year ago, I thought it was fancy autocomplete. Smart suggestions, quick fixes, nothing revolutionary.
I was completely wrong.
The shift isn’t about better autocomplete. It’s about fundamentally changing how you think about development.
I used to treat AI as a chatbot I consult. Now I had turned Cursor into an operating system: .cursorrules remembers my standards, slash commands automate workflows, MCP connects to external tools, Background Agents work while I sleep.
You stop thinking “I need to code this” and start thinking “I need to design the system that codes this.”
The reality check — three Cursor-specific challenges you’ll still hit:
- Your .cursorrules needs constant refinement.
- Your AI costs will surprise you.
- Project context drifts after multiple sessions.
But these aren’t reasons to stop. They’re the edge cases that separate people who use Cursor as an IDE from people who build systematically with it.
While you’re figuring this out, most developers are still copying context between ChatGPT and their IDE. The gap I noticed eight months ago? It’s wider now. Every week you build with this system, every feature you learn, they compound into capabilities that become impossible to explain to someone who hasn’t lived through it.
The transformation is gradual. Week 1 feels clumsy. Month 3, you’re orchestrating systems you couldn’t have imagined before.
But you don’t need eight months. You have this article. You have the sequence. Start with Section 1. Build one feature. Let the system emerge.
Want to go deeper?
This article gives you the foundation. But implementation is where most builders get stuck, not from lack of understanding, but from hitting edge cases this article couldn’t cover.
For paid subscribers, I’ve created:
Complete implementation guides - My actual .cursorrules files, slash command templates, MCP configurations you can copy and adapt
Office hours Q&A - Bring your specific Cursor questions (or any AI builders problems), I’ll help you troubleshoot live
Future workshops - Hands-on sessions where we build together (similar to the 3-day AI workshop I just ran on systematic AI adoption)
These aren’t theoretical. They’re the exact systems I use daily to ship products.
If you implement any of this, share what works (or breaks) in the comments. Every builder’s Cursor setup evolves differently, that’s how we all learn.
This is an exceptional deep dive! Seeing Cursor evolve from a helper to a full AI operating system is eye-opening. Your breakdown makes complex workflows feel achievable.
Love how you're using modes, Jenny. Chaining them together is brilliant!